ND NSK OE Rear Hub Installation
Thank you for your purchase! These hubs are sourced directly from NSK Japan for you. If you have a question or issue please contact us ASAP. Please be sure to read this entire set of installation instructions through to the end and perform regular maintenance.

Installation guidelines - CONTACT US WITH any COMMENTS, QUESTIONS OR CONCERNS.
ALWAYS consult a professional if you are uncertain performing this work yourself.
-
For now we are referencing this as a guide but do not own the information
2016 – 2025 MX-5 – DriveLine/Axle
REAR WHEEL HUB COMPONENT REMOVAL/INSTALLATION
CAUTION:
-
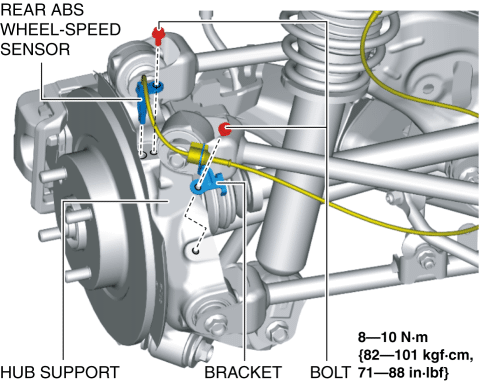
Performing the following procedures could cause an open circuit in the rear ABS wheel-speed sensor wiring harness if it is pulled by mistake. Before servicing, disconnect the rear ABS wheel-speed sensor and set it aside so that the wiring harness will not be pulled by mistake.
1. Remove the rear ABS wheel-speed sensor and bracket from the hub support, and set it aside so that it does not interfere with the servicing.
2. Remove the rear brake caliper component and suspend it in a place out of the way using a cable.
3. Remove the rear disc plate.
4. When working on the left side of the vehicle, disconnect the auto leveling sensor link from the lower lateral link.
5. Disconnect the rear stabilizer control link from the lower lateral link.
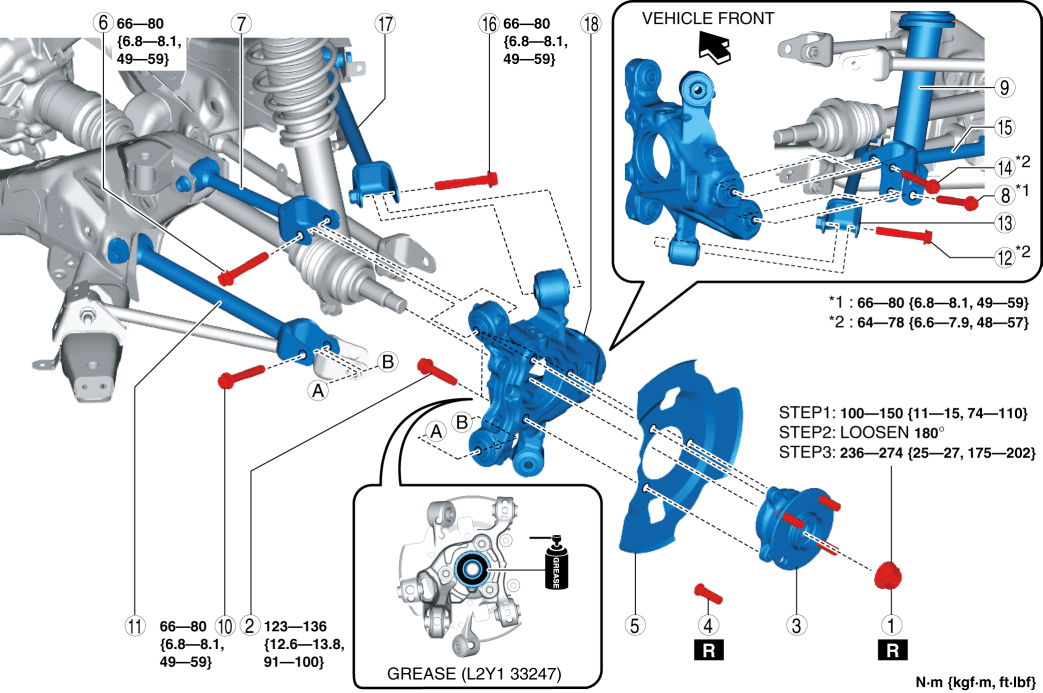
6. Remove in the order shown in the figure.
TIP: After removing the axle nut, remove a some of the lateral link bolts to allow the assembly to pivot. Push the axle inboard to get the rubber boot away from the bolt heads. You should then have enough room to securely seat a socket on each bolt head.
7. Install in the reverse order of removal.
8. Inspect the rear wheel alignment and adjust if necessary.
1 Locknut
2 Bolt
3 Wheel hub component
4 Rear wheel hub bolt
5 Dust cover
6 Bolt
7 Upper lateral link
8 Bolt
9 Rear shock absorber and coil spring
10 Bolt
11 Lower link
12 Bolt
13 Trailing link
14 Bolt
15 Lower lateral link
16 Bolt
17 Leading link
18 Hub support
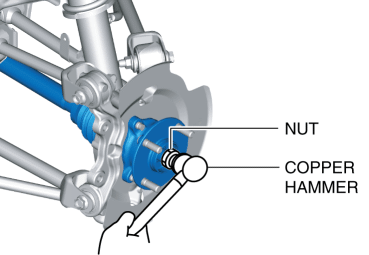
Locknut Removal Note
1. After removing the locknut, temporarily install a nut to the end of the rear drive shaft.
2. Tap the nut with a copper hammer and separate the rear drive shaft from the axle.
Rear wheel stud Removal Note
NOTE:
-
Remove the rear wheel stud only if there is any malfunction.
1. Remove the rear wheel stud from the wheel hub component using a press ensuring that the hub flange is FULLY SUPPORTED.
Bolt Installation Note
1. Completely tighten the bolts shown in the figure to the specified torque with the vehicle lifted up.
-
Tightening torque 49 to 59 ft·lbf
Rear wheel Hub Bolt Installation Note
1. Press in new rear wheel hub bolt into the wheel hub component using a press while FULLY SUPPORTING the hub flange. You must ONLY USE wheel studs with the proper knurl diameter to avoid damaging the hub. If you are unsure of this, MiataHubs offers this service when purchasing.
Wheel Hub Component Installation Note
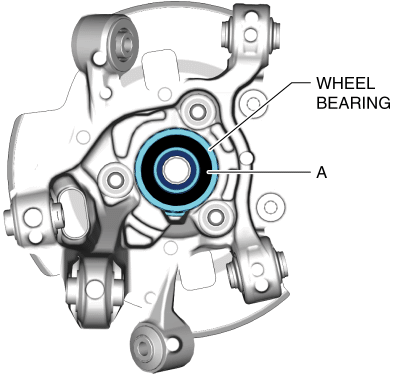
1. Apply grease (L2Y1 33247) to the wheel bearing inner race and rear drive shaft contact surfaces (area A in the figure).
2. Install the wheel hub component.
Locknut Installation Note
1. If dust or grease is on the drive shaft thread area, wipe it off with a cloth.
2. After tightening the locknut once at a torque of 74 to 110 ft·lbf , loosen it 180 degrees once, and then retighten it at a torque of 175 to 202 ft·lbf
-------------------------------------------------------------------------------------------------------------------------------------
IMPORTANT NOTE. It is recommended that you pay VERY close attention to the hubs & bearings at all times and through continued inspection & maintenance. If you notice any unusual sounds or feelings, IMMEDIATELY come into the pits and check for proper nut torque and bearing play. If you find a problem, please contact us.
-------------------------------------------------------------------------------------------------------------------------------------
Thanks again for your purchase and support of Miatahubs.com as we work to better the Miata community and make this chassis the best thing on racetracks worldwide, winning races and breaking hearts of higher dollar competitors. Feel free to call or text us with any questions or concerns, during install or at the track.
JUSTIN
Please leave a voicemail or text if we don’t pick up!
-------------------------------------------------------------------------------------------------------------------------------------
Warranty Disclaimer Miata Hubs LLC products and parts are sold “as is” without any expressed or implied warranty of merchantability or fitness for a particular purpose. Miata Hubs LLC shall not, under any circumstances, be liable for any special, incidental or consequential damages, including, person, party, or property, but not limited to, damage, or loss of property or equipment, loss of profits or revenue, cost of purchased or replacement goods, or claims of customers of the purchase, which may arise and/or result from sale, installation or use of these parts. Should such products or parts prove defective following their purchase, the buyer and not the manufacturer, distributor(s), or retailer(s); assume the entire cost of all necessary services or repair as result of a part(s) failure. Installation of these parts could adversely affect the original manufacturer’s warranty coverage. This part is intended for off road use only and is recommended to be installed by a professional.